People. Code. Impact.
Wij zijn polder knowledge
Wij bedenken en bouwen slimme online oplossingen voor organisaties die méér impact willen maken, maar niet altijd precies weten hoe. Nieuwsgierig als we zijn duiken we diep in jouw wereld. We kunnen niet anders, want door jouw context te begrijpen én voelen creëren we digitale oplossingen die echt werken, voor gebruikers én voor de organisatie.
Wij helpen je vooruit met:
Hoe we te werk gaan
Onze Polder-methode biedt ruimte voor creativiteit, met een scherpe focus op resultaat. Hoe? Eerst duiken we in jouw situatie: wie ben je, wat speelt er en wat is er écht nodig? Dat willen we voelen én begrijpen. Daarna laten we onze creativiteit los: met de behoeften van alle stakeholders als vertrekpunt bedenken we slimme oplossingen. Die werken we uit in een ontwerp en maken we tastbaar met een prototype. Op basis van gebruikersfeedback blijven we doorontwikkelen. Het is een iteratief proces: stap voor stap werken we naar het eindproduct.

WAT we maken
 Loopt je proces vast, ontbreekt het aan inzicht of heb je juist een briljant idee?
Bij Polder Knowledge ontwikkelen we webapplicaties die écht het verschil maken. Maatwerk waar nodig, standaard (open source) oplossingen waar mogelijk. Pragmatisch en Agile. Een hippe term misschien, maar het betekent simpelweg dat we flexibel werken, in korte sprints en met tussentijdse opleveringen. Altijd met oog voor de belangen en behoeften van alle stakeholders (zie de PK-methode).
We weten dat een webapplicatie nooit op zichzelf staat. Met API-integraties en workflow-agents koppelen we applicaties en automatiseren we processen over verschillende systemen heen. Zo ontstaat een schaalbare, kosteneffectieve oplossing die snel inzetbaar is en direct waarde oplevert.
 Automated workflows maken processen efficiënter, consistenter en schaalbaar.
Polder Knowledge ontwerpt en ontwikkelt workflows die bedrijfsprocessen automatiseert en systemen, data en beslismomenten naadloos met elkaar verbindt.
We bouwen geautomatiseerde workflows met meerdere stappen, complexe goedkeuringsstructuren, gebruikersrollen en -rechten, logging en rapportages. Deze workflow-oplossingen ondersteunen uiteenlopende organisatorische en operationele processen.
Waar het waarde toevoegt, zetten we AI in binnen automated workflows. Bijvoorbeeld met AI-agents die informatie verzamelen, analyseren, verrijken of vervolgstappen initiëren. Zo ontstaan AI-gedreven workflows die niet alleen automatisch zijn, maar ook adaptief en schaalbaar.
 Bij Polder Knowledge zetten we AI in waar het écht werkt. Denk aan het automatiseren van repetitieve taken om efficiëntie te verhogen, het analyseren van grote datasets voor snellere besluitvorming, en het verbeteren van klantenservice via AI-aangedreven chatbots. Data speelt hierin de sleutelrol: garbage in is garbage out tenslotte. Daarom zorgen we voor veilige en betrouwbare data-integraties. Transparantie is voor ons essentieel: je moet weten hoe en op basis van welke input beslissingen worden genomen, geen black box. En AI werkt het beste samen met mensen, dus jij blijft in controle.
Bij ons is AI een hulpmiddel, geen tovermiddel.
 Wij vertalen jouw data naar heldere visuele overzichten.
Door zowel interne als externe databronnen te combineren, creëren we dashboards die relevante informatie bieden. We denken met je mee over hoe we de beschikbare data kunnen structureren, verrijken en afstemmen op de rol van de gebruiker. Onze dashboards bieden filtering, geavanceerd zoeken en rapportagemogelijkheden. Voor klanten zoals Hartmann en TotalEnergies is inzicht in hun KPI’s een essentieel onderdeel van hun bedrijfsvoering.
 Geef het aan ons, en wij knopen het aan elkaar.
Een beetje simpel gesteld natuurlijk, maar wij begrijpen de kracht van API-koppelingen en hoe ze processen kunnen optimaliseren. Zie het als een laag tussen verschillende softwarepakketten die communicatie en data-uitwisseling soepel laat verlopen. We hebben ruime ervaring met zowel de integratie van bestaande API's als het op maat ontwikkelen van API-koppelingen.
Voor TotalEnergies Lubricants realiseerden we bijvoorbeeld een API die communiceert met hun SAP-systeem en een andere API zorgt voor het ophalen van RDW voertuiginformatie. Wat de behoefte ook is, wij zorgen voor veilige en efficiënte koppelingen die perfect aansluiten op jouw systemen en processen. Laat maar stromen die data ツ
 Sta jij op het punt een online community op te zetten?
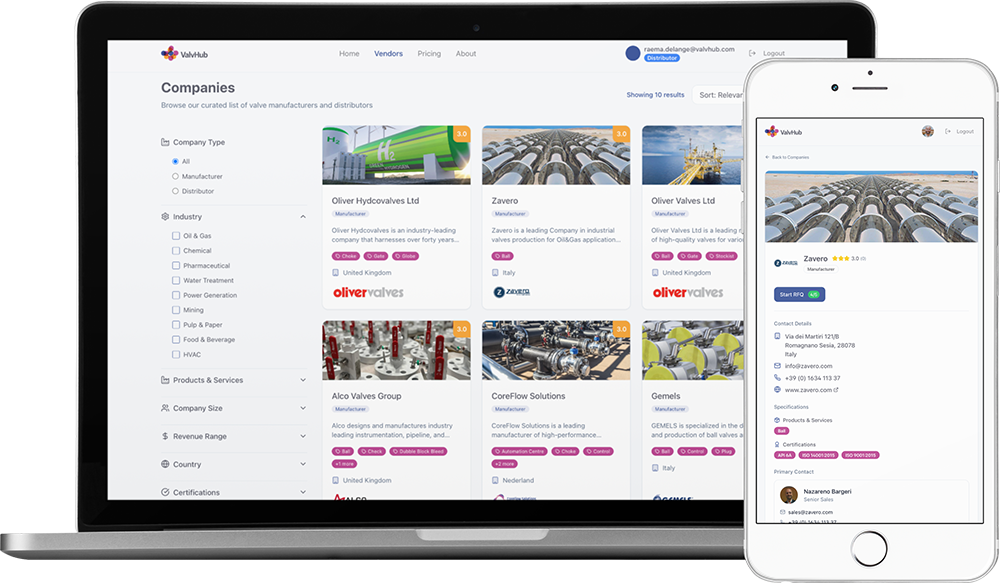
Top, je bent bij ons aan het juiste adres. Zo bouwden we al de wetenschappelijk My LifeWatch-community, een sourcing marketplace voor ValvHub en een mentoring platform voor iSeekMe. Stuk voor stuk omgevingen waar mensen samenkomen met een gemeenschappelijk doel. En daar begint het: wat is het doel van jouw community? Met de Polder Knowledge-methode maken we dat glashelder. De techniek? Die regelen wij natuurlijk. Van een stevige basis met standaard functionaliteiten zoals user management, connecties, nieuws, events en chat, tot maatwerkwensen. En last but not least, we zorgen voor een schaalbare, veilige en stabiele opzet, zodat je community lekker kan groeien.
 Erfgoed verbinden in de praktijk
NDE-compatibel werken betekent erfgoedinformatie zo publiceren dat deze vindbaar, verbonden en herbruikbaar wordt binnen de nationale infrastructuur voor digitaal erfgoed. Dat vraagt om meer dan richtlijnen alleen: het vraagt om concrete keuzes, technische uitvoering en een heldere visie op hoe collecties samenhang krijgen.
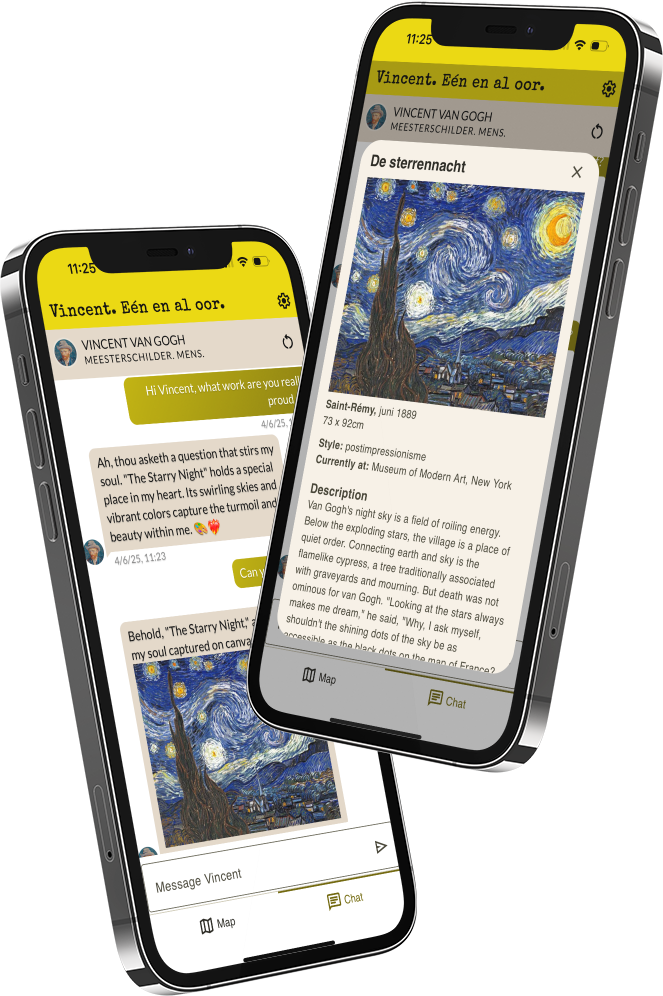
Polder Knowledge helpt erfgoedorganisaties om die stap te zetten. Van NDE-compatibel collectiebeheer en Linked Open Data tot publieksdiensten die verbonden erfgoed écht zichtbaar maken. Zo ontwikkelden we voor Stichting Wijkcollectie een NDE-compatibel platform voor het immaterieel erfgoed van Rotterdam en realiseerden we met Vincent. Eén en al oor, een digitale erfgoedervaring waarin historisch gevalideerde data en kunstwerken samenkomen in een gesprek.
Wil je weten hoe jouw erfgoedcollectie onderdeel kan worden van het nationale netwerk en voorbereid is op toekomstige toepassingen?
Lees verder en ontdek hoe NDE-compatibel werken er in de praktijk uitziet.


TEAM WORK

Rob Mulder
Owner - UX/UI
Rob maakt concepten concreet en processen inzichtelijk door ze te visualiseren vanuit ‘Design Thinking’. De mens centraal dus. Initiefnemer van Vincent, Eén al Oor (conversational AI).
Antoni Huguet Vives
Owner - Front-End developer
Vanuit Mallorca of Deventer, het maakt Antoni niet uit waar hij kickass webapplicaties ontwikkelt. Als allround front-end developer zet hij graag zijn tanden in complexe applicaties.
Mark Willemen
Owner - Applicatie architect
Solution architect met veel expertise op het gebied van SaaS. Hij stopt pas als het 'probleem' gekraakt is. Oplossingen bedenkt hij vaak 's nachts, waarom ook niet.

Rowan van Balen
Back-end developer
Rowan, aka mstr. TotalEnergies, want zoveel domeinkennis is echt indrukwekkend. Een back-ender met inzicht in de business. Pragmatisch ingesteld, op Rowan kun je bouwen.
Sherwin Lemmen
Back-end developer
Ver weg, maar altijd dichtbij. Vanuit Java (niet de taal) is Sherwin een veelzijdige back-ender. Met een talent voor het voorzien van: wat als... user scenario's. Fijn, zo iemand!
Justin Verweel
DevOps
Onze steun en toeverlaat voor het opzetten en onderhouden van OTAP straat, migraties en infrastructuren. Met een achtergrond als developer begrijpt hij ons als de beste.
Rob Mulder
Owner - UX/UI
Rob maakt concepten concreet en processen inzichtelijk door ze te visualiseren vanuit ‘Design Thinking’. De mens centraal dus. Initiefnemer van Vincent, Eén al Oor (conversational AI).
Antoni Huguet Vives
Owner - Front-End developer
Vanuit Mallorca of Deventer, het maakt Antoni niet uit waar hij kickass webapplicaties ontwikkelt. Als allround front-end developer zet hij graag zijn tanden in complexe applicaties.
Mark Willemen
Owner - Applicatie architect
Solution architect met veel expertise op het gebied van SaaS. Hij stopt pas als het 'probleem' gekraakt is. Oplossingen bedenkt hij vaak 's nachts, waarom ook niet.
Rowan van Balen
Back-end developer
Rowan, aka mstr. TotalEnergies, want zoveel domeinkennis is echt indrukwekkend. Een back-ender met inzicht in de business. Pragmatisch ingesteld, op Rowan kun je bouwen.
Sherwin Lemmen
Back-end developer
Ver weg, maar altijd dichtbij. Vanuit Java (niet de taal) is Sherwin een veelzijdige back-ender. Met een talent voor het voorzien van: wat als... user scenario's. Fijn, zo iemand!
Justin Verweel
DevOps
Onze steun en toeverlaat voor het opzetten en onderhouden van OTAP straat, migraties en infrastructuren. Met een achtergrond als developer begrijpt hij ons als de beste.

FAQ
Waarom Polder Knowledge?
Het kiezen van een IT-partner is lastig, omdat je die ene partij zoekt die écht bij je past. Voor ons begint een langdurige samenwerking met ‘een klik’.
We willen écht begrijpen én aanvoelen hoe jouw organisatie werkt, waar de knelpunten zitten en waar kansen liggen. Zo combineren we strategisch inzicht met technische uitvoering.
We werken met een senior kernteam van technisch inhoudelijke specialisten, aangevuld met een flexibele schil van vaste experts. Onze werkwijze is direct, pragmatisch en iteratief: korte lijnen, geen accountmanagers als tussenlaag, en directe betrokkenheid van de mensen die het werk ontwerpen, bouwen en beheren.
Voor wie werken jullie?
We werken vooral voor middelgrote, technisch georiënteerde organisaties en MKB-maakbedrijven die willen opschalen, maar merken dat processen, systemen of handmatige werkwijzen beginnen te knellen.
We hebben met name ervaring in de energiesector, de zorg, Legal tech en ecologie. Valt jouw organisatie buiten deze sectoren, maar herken je de uitdaging? Ook dan denken we graag mee. Bekijke onze services!
Wat bedoel je met strategisch technologiepartner?
Als strategisch technologiepartner kijken we verder dan alleen de technische uitvoering. Met onze Polder-methode beginnen we bij het begrijpen én aanvoelen van de organisatie: wat wil je bereiken, hoe werken de processen en waar ligt het werkelijke knelpunt? Waar relevant gebruiken we ons IT Maturity Model om inzichtelijk te maken waar de organisatie nu staat en waar ontwikkeling nodig is.
Vanuit dat inzicht bepalen we samen welke aanpak en technologie waarde toevoegen. We bedenken een passende oplossing, werken die uit in een ontwerp en maken haar waar nodig tastbaar met een prototype. Vervolgens bouwen en verbeteren we stap voor stap, op basis van data en feedback van gebruikers en andere betrokkenen.
Wat doen jullie precies?
Polder Knowledge helpt organisaties bij automatiserings- en optimalisatievraagstukken. We ontwikkelen onder meer websites, webapplicaties, datagedreven workflows, strategische dashboards, communities en kwaliteitsmanagementsystemen. Hoe dat er in de praktijk uitziet, zie je in onze cases en in wat klanten over onze samenwerking zeggen.
Bekijk onze services!
Doen jullie meer dan software ontwikkelen?
Ja. Onze toegevoegde waarde begint ruim vóór de eerste regel code. We helpen het vraagstuk scherp te krijgen, processen en onderliggende drijfveren te doorgronden en mee te denken over kansrijke concepten. Daarbij toetsen we de haalbaarheid, scherpen we aannames aan en bepalen we welke aanpak en technologie daadwerkelijk waarde toevoegen. Vervolgens vertalen we het concept naar een sterke gebruikerservaring en een helder interfaceontwerp.
Met een proof of concept of MVP kunnen we ideeën snel tastbaar maken, testen en valideren voordat we grotere investeringen doen. Dat kan uiteindelijk leiden tot een maatwerkapplicatie, systeemkoppeling, datagedreven workflow, strategisch dashboard of een zinvolle toepassing van AI.
Blijven jullie ook na oplevering betrokken?
Ja. Na oplevering kunnen we betrokken blijven bij beheer, onderhoud, ondersteuning en verdere ontwikkeling. We monitoren hoe de oplossing in de praktijk wordt gebruikt, lossen problemen op en voeren verbeteringen door wanneer processen, gebruikersbehoeften of technologie veranderen.
De afspraken stemmen we af op wat nodig is. Dat kan variëren van ondersteuning op aanvraag tot een structurele samenwerking met vaste uren of een SLA.
Wanneer is het zinvol om AI toe te passen?
AI is zinvol wanneer het werk aantoonbaar beter, sneller of betrouwbaarder maakt. Bijvoorbeeld door informatie te classificeren, gegevens uit documenten te halen, patronen te herkennen, medewerkers te ondersteunen of passende vervolgstappen in gang te zetten. Tegelijkertijd kan AI meer betekenen dan het automatiseren van bestaande taken. Het biedt aanleiding om opnieuw te kijken naar hoe werk, processen en zelfs organisaties zijn ingericht.
Waar AI precies naartoe gaat, weet niemand. Daarom zijn we geen AI-evangelisten, maar AI-realisten: nieuwsgierig naar de mogelijkheden, kritisch op de hype en bereid om nieuwe concepten snel in de praktijk te toetsen. We beginnen niet bij AI, maar bij het vraagstuk. Als een eenvoudigere oplossing beter werkt, heeft die onze voorkeur.
Bestaan jullie al lang?
Polder Knowledge bestaat sinds 1999. Sindsdien hebben we aan uiteenlopende projecten gewerkt voor ondernemers en organisaties in verschillende sectoren. Door die brede praktijkervaring doorzien we processen én de belangen, keuzes en doelstellingen die eraan ten grondslag liggen. We kunnen ons snel in een organisatie verplaatsen, tot creatieve oplossingen komen en technologie inzetten waar die daadwerkelijk waarde toevoegt. Die ervaring combineren we met een nieuwsgierige en flexibele manier van werken. We willen eerst begrijpen hoe een organisatie en haar processen werken, voordat we iets gaan bouwen.
𝐄𝐞𝐧 𝐯𝐞𝐭𝐭𝐞 𝐯𝐞𝐫𝐠𝐞𝐥𝐢𝐣𝐤𝐢𝐧𝐠𝐬𝐭𝐨𝐨𝐥 𝐯𝐨𝐨𝐫 𝐓𝐨𝐭𝐚𝐥𝐄𝐧𝐞𝐫𝐠𝐢𝐞𝐬
Sorry voor de woordgrap, maar voor TotalEnergies realiseerden we de Vetten Vergelijker.
Het juiste smeervet kiezen is essentieel voor alles wat draait, beweegt of zwaar wordt belast. Van automotive tot industrie, van motor tot robotarm: de beste keuze hangt sterk af van toepassing, belasting, temperatuur en viscositeit.
Met de Vetten Vergelijker kunnen gebruikers smeervetten eenvoudig naast elkaar zetten en sneller het juiste product selecteren.
Hoe vet is dat 🙃
#TotalEnergies #smeervetten #industrie #automotive #softwaredevelopment #digitaltools
Op 27 nov. sprak ik op het erfgoed event van het jaar: ‘Van Gisteren voor Morgen’ in H`ART Museum Amsterdam. Over ons avontuur met de ‘digital twin’ van Vincent van Gogh (Vincent. Eén en al oor).
Het thema; kan het publiek direct in dialoog met historische figuren zoals Vincent?
Op 27 nov. sprak ik op het erfgoed event van het jaar: ‘Van Gisteren voor Morgen’ in H`ART Museum Amsterdam. Over ons avontuur met de ‘digital twin’ van Vincent van Gogh (Vincent. Eén en al oor).
Het thema; kan het publiek direct in dialoog met historische figuren zoals Vincent?
NPO Radio1 gaf aandacht aan ons initiatief "Hier is Vincent. Eén en al oor.` In een interview in het programma De NieuwsBV gaf Tomas Snels namens ons team een toelichting geven over de aanleiding, ambitie en aanpak van ons AI-project en konden luisteraars direct vragen stellen via de NPO Radio1 app.
Luister hier het interview terug: https://lnkd.in/eaBJtJqY
Of ga hier ook in gesprek met Vincent van Gogh: https://lnkd.in/eZw-vs5Q
Ook dit jaar weer de technische realisatie van het online jaarverslag van TenneT mogen verzorgen. Mooie cocreatie met DartDesign
https://lnkd.in/essaWi4Q
hashtag#tennet hashtag#annualreports
Ook dit jaar weer de technische realisatie van het online jaarverslag van TenneT mogen verzorgen. Mooie cocreatie met DartDesign
https://lnkd.in/essaWi4Q
hashtag#tennet hashtag#annualreports
It was an absolute pleasure to present our “Vincent - Eén en al Oor” project to the data science students at Jheronimus Academy of Data Science yesterday!
The challenge? Dive deep into Vincent’s 900+ letters and capture his `soul` to create authentic and engaging conversations with his Digital Twin. We spent the afternoon with Prof. Plato Leung, Alex Bastiaens and Silviya Velkova answering questions, though we didn’t have all the answers. But hey, that’s why we were there in the first place! There is much to consider, not just the tech and data, but also the business and legal aspects.
Looking forward to our next session!
hashtag#JADS hashtag#VincentVanGogh hashtag#LLM hashtag#AI hashtag#DigitalTwin
CMD student Rick Wiemer is begonnen met zijn stage. Voor zijn afstudeerproject gaat hij onderzoeken of onze iSeekMe App ook voor studenten van De Haagse Hogeschool ingezet kan worden. Hoe kijken (MBO/HBO) studenten naar persoonlijke ontwikkeling, zijn ze bezig met hun ambitie, kennen ze hun talenten. En hoe zou een App als iSeekMe daarin een rol kunnen spelen. Rick gaat dit eens tot op de bodem uitzoeken. Succes!
#futurefitmindset #cmddenhaag #iseekme
Coreworks bouwt podia en steigers, ze spreken de taal van staal. Wij bouwen websites en webapplicaties, we spreken de taal van code!
We zijn er trots op om voor Coreworks een nieuwe website ontwikkeld te hebben. In WordPress en volledig responsive.
Coreworks bouwt podia en steigers, ze spreken de taal van staal. Wij bouwen websites en webapplicaties, we spreken de taal van code!
We zijn er trots op om voor Coreworks een nieuwe website ontwikkeld te hebben. In WordPress en volledig responsive.
This week we are in Silicon Valley! We will be meeting some interesting people (from around the world) to brainstorm about a new way of connecting and collaborating. Today we had some time to explore San Francisco, which was very cool (and also very hot)!
This week we are in Silicon Valley! We will be meeting some interesting people (from around the world) to brainstorm about a new way of connecting and collaborating. Today we had some time to explore San Francisco, which was very cool (and also very hot)!
Today we are very proud to be nominated for the Drupal Splash awards with our Drupal partner Atom. Together we`ve build an online advice and ordering system for TOTAL Lubricants where orders can be placed both manually and automatically (by Telemetry). On june 27 we will know if we have won! 🤞🏻https://www.splashawards.nl/nominaties
#splashawards #drupaljam #angular #angularjs #apigility #totalnederland
Voor Total Nederland ontwikkelden wij een Mobile First webapplicatie die Total Card houders helpt naar het dichtstbijzijnde accepterende tankstation te navigeren. Dit advies is gebaseerd op de geolocatie van de gebruiker. #totalnederland #webapp
Voor Total Nederland ontwikkelden wij een Mobile First webapplicatie die Total Card houders helpt naar het dichtstbijzijnde accepterende tankstation te navigeren. Dit advies is gebaseerd op de geolocatie van de gebruiker. #totalnederland #webapp
Vandaag is het #wereldgezondheidsdag. Gemiddeld lopen in ons land per jaar zes tot tien op de honderd patiënten een #ziekenhuisinfectie op. We zijn er dan ook trots op voor Hartmann een tool ontwikkeld te hebben die de compliance voor handhygiëne in de zorg helpt te verbeteren. Meer over deze case: http://ow.ly/1yfw50p4b1x
Vandaag is het #wereldgezondheidsdag. Gemiddeld lopen in ons land per jaar zes tot tien op de honderd patiënten een #ziekenhuisinfectie op. We zijn er dan ook trots op voor Hartmann een tool ontwikkeld te hebben die de compliance voor handhygiëne in de zorg helpt te verbeteren. Meer over deze case: http://ow.ly/1yfw50p4b1x
Als partner van DartGroup (dartgroup.nl) hebben we ook dit jaar weer de technische realisatie van het online jaarverslag van ASM mogen verzorgen. Mooie co-creatie met een mooi resultaat!
ASM Annual Report 2018: http://ow.ly/fviT50nO7KN
Als partner van DartGroup (dartgroup.nl) hebben we ook dit jaar weer de technische realisatie van het online jaarverslag van ASM mogen verzorgen. Mooie co-creatie met een mooi resultaat!
ASM Annual Report 2018: http://ow.ly/fviT50nO7KN